Just for Lori

This first picture is kinda blurry, but I wanted you to see how I insert the needle into the second stitch.
Now the needle is all the way in the second stitch, ready to knit.

Wrap yarn over ...

Pull through the loop (finish the knit stitch) but don't pull too much yarn through.

Now twist your needle to the right and into the first stitch. You have to boss it a little bit because it's awkward.

Wrap yarn over to knit the stitch

Pull through the loop

Slide both stitches off

It should look like this.

Bailey

The design for this aran scarf was inspired by a similar scarf offered in the Winter 2006 Land's End catalog. Bailey Island, located on Casco Bay in the Town of Harpswell, Maine, features a cute gift shop called Land's End. As a child, my mother and I would often drive to Bailey Island in the summer and picnic on the giant sloping metamorphic rocks outside of the gift shop. Although I loved trolling the beach for treasures, my favorite part of the day was shopping for a new cotton sailor bracelet which looked exactly like the alternating cable rib pattern in this scarf. When I first discovered that there was a clothing catalog called Lands End, I naturally assumed that it was the same shop, and was peeved when I discovered that it was not. This scarf is my tribute to those summer days at the real Land's End.

Finished measurements (without blocking) 6.5 inches wide by 77 inches long - including fringe

Yarn: 575 yards of worsted weight yarn (note: the fringe uses 31 yards and adds approximately 11 inches to the total finished length) Scarf in photo used 3 skeins of Malabrigo (216 yds per skein) in color "Natural"

Gauge: 20 sts and 26 rows = 4 inches (5 sts/inch)

Needles: U.S. size 8 and size D (3.0 mm) crochet hook

Abbreviations:

st = stitch
sts = stitches
k = knit
p = purl
RS = Right Side
WS = Wrong Side
(pm) = place marker
cn = cable needle
C4F = slip 2 sts to cn and hold in front, k2 then k2 from cn
CFB = slip 2 sts to cn and hold in back, k2 then k2 from cn
T3kB = slip 1 st to cn and hold back, k2 then k1 from cn
T3F = slip 2 sts to cn and hold in front, p1 then k2 from cn
T3pB = slip 1 st to cn and hold in back, k2 then p1 from cn

Cable Patterns:

NOTE: For all patterns, on all even numbered (WS) rows, work stitches as they appear. Instructions for the some even numbered rows are given only as a reminder of how many rows are worked.

Pattern A: Open Work Cable with Moss Stitch (worked over 12 sts and 16 rows)

Row 1: RIGHT SIDE - p4, C4F, p4 ; LEFT SIDE - p4, C4B, p4
Row 2 and all even numbered rows: works sts as they appear
Row 3: p3, T3kB, T3F, p3
Row 5: p2, T3kB, p1, k1, T3F, p2
Row 7: p1, T3kB, (p1, k1) twice, T3F, p1
Row 9: P1, k2, (p1, k1) 3 times, k2, p1
Row 11: p1 T3F, (p1, k1) twice, T3pB, p1
Row 13: p2, T3F, p1, k1, T3pB, p2
Row 15: p3, T3F, T3pB
Row 16: work sts as they appear

Pattern B: Alternating Cable Rib (worked over 6 sts and 4 rows)

Row 1: C4B, k2
Row 2: p6
Row 3: k2, C4F
Row 4: p6

Pattern C : Double Cable (worked over 10 sts and 8 rows)

Row 1: p1, C4B, C4F, p1
Row 2 and all even numbered rows: k1, p8, k1
Rows 3, 5 and 7: p1, k8, p1
Row 8: k1, p8, k1


Pattern notes:

Instructions are provided for placing markers. Whether or not you use markers is up to you. Each cable pattern is divided by a purl stitch which I found sufficient to use as a visual marker, but do whatever feels most comfortable to you. Sometimes it is helpful to use the markers until you become familiar with the pattern.

Each full repeat is composed of 16 rows. Within those 16 rows, you will repeat the Pattern A once, Pattern B 4 times, and Pattern C twice. Please note that on Row 1 of Pattern A, the cables on the Right and Left cross in opposite directions.

Instructions are given using a cable needle, but all of the cables are easily worked without one. There are a number of tutorials available on the web including Grumperina's, Wendy's and this YouTube video.

Instructions:

Cast on 50 sts (I use long tail method)

Set up Row: p2 (pm) k4, p4, k4 (pm) p6 (pm) k1, p8, k1 (pm) p6 (pm) p4, k4, p4 (pm) p2

Row 1 (RS): k2, work Row 1 of Pattern A for RIGHT SIDE over 12 sts, work Row 1 of Pattern B over 6 sts, work Row 1 of Pattern C over 10 sts, work Row 1 of Pattern B over 6 sts, and work Row 1 of Pattern A for LEFT SIDE over 12 sts, k2
Row 2 and all even numbered (WS) rows: work all sts as they appear (knit the knits and purl the purls)
Row 3: k2, work Row 3 of all Patterns as set up in Row 1, k2
Row 5: k2, work Row 5 of Pattern A, Row 1 of Pattern B, and Row 5 of Pattern C, k2
Row 7: k2, work Row 7 of Pattern A, Row 3 of Pattern B, and Row 7 of Pattern C, k2
Row 9: k2, work Row 9 of Pattern A, Row 1 of Pattern B, and Row 1 of Pattern C, k2
Row 11: k2, work Row 11 of Pattern A, Row 3 of Pattern B, and Row 3 of Pattern C, k2
Row 13: k2, work Row 13 of Pattern A, Row 1 of Pattern B, and Row 5 of Pattern C, k2
Row 15: k2 work Row 15 of Pattern A, Row 3 of Pattern B, and Row 7 of Pattern C, k2
Row 16 (WS): work all sts as they appear

Repeat Rows 1 thru 16 a total of 27 times, or to desired length, ending on row 16. Bind off all stitches in pattern according to Row 1 (yes, that means cable and then bind off - this helps keep the stitches from spreading out during bind off.)

Weave in ends and block if desired. Scarf shown was not blocked.
Fringe:

Cut 84 strands 13 inches long. Note: I wrapped the yarn around a rotary cutting ruler 6.5 inches wide and then cut along one side. You may also use a book or any other method to make your strands.

Insert crochet hook from back to front through second stitch in cast on/bind off end. Hold 2 strands of fringe together and fold in half. Insert crochet hook in the loop end and pull through the stitch part way with crochet hook. Draw ends of fringe through this loop and pull ends to close the loop. Repeat approximately every other stitch in cast on/bind off end even spaced across. Trim fringe if needed. Model scarf has 21 fringes across each end.

Classic Collar Cardigan

Pattern: Classic Collar Cardigan with Straight Sleeves from Paton's Next Step Three - size XS

Yarn: Berroco Keltic in color Thistle (# 5853) (I can't remember how many skeins I bought!!)

Started February and finished September 18th, 2007

Modifications: Yarn substitution and shorter sleeves.
Comments: OK, I am a self admitted yarn snob when it comes to acrylic, but I do like this yarn despite the plastic portion of the contents. It's very light weight, not at all scratchy, and warm. I love these Patons patterns, and can't wait to make another one form either this book or Next Step Two. When all my knitting pals (and Mr. S) saw this pattern they said "It's nice, but I don't like the big buttons". Ha! That's what attracted me to it!

Louisa Harding V-neck Cardigan

Pattern: V-neck Cardigan from Louisa Harding's Modern Classics

Yarn: GGH Linova (color #19 - Pink) used just about 6.5 skeins (100m per skein) for a 34 inch finished bust

Needles: Size 3 , 24 inch circular Susan Bates Quicksilver and size 1 Addi Turbo 40 inch circulars.

Modifications: Substituted a cotton and linen blend worsted weight yarn for the Kashmir DK called for in the pattern and knit it to a DK gauge with smaller needles. Shortened sleeves. Created a smaller size and added waist shaping according to my measurements rather than the symmetrical hourglass shape called for in most patterns. I seem to have a long rib cage - does that make me "long waisted"?
Comments: Although I was nervous about the shaping and the fit of this garment, I am very pleased with how it came out. The yarn was a little splitty to work with, but has gorgeous drape and was not at all difficult to knit with on the smaller size needles, which helps to keep the fabric from stretching out of shape. I have worn this a number of times, and unlike other cotton garments I've knitted, it hasn't grown any. I would definitely knit this sweater again!

Ginger


Pattern: Ginger from the Rowan Summer Tweed Collection by Kim Hargreaves size XS

Yarn: Rowan Summer Tweed in Summer Berry (color 537) Pattern calls for 3 skeins - I needed 4 (hrmmmph!)

Needles: Takumi Bamboo (24 inch circulars) in sizes 7 and 8

Modifications: None, other than the fact that I needed an extra skein for the last 14 stitches! I also used some leftover Royal Bamboo yarn in a matching color to seam up.
Comments: This is a not a very pleasant yarn to knit with as it is nubby and has absolutely no give, but it comes in such luxurious colors and wears so well that the pain is worth it!

Fifi

Pattern: Fifi by French Girl Knits, featured on the Sexy Knitters Club for Summer 2007

Started July 3rd and finished September 4th, 2007

Yarn: Rowan Calmer in Lucky (color # 484) Used just over 3 skeins for size 29.5.

Needles: Size 7 Addi Turbo 24" and Takumi Bamboo dpns in sizes 6 and 7.

Modifications: Added extra ribbing at sides to accommodate "apex" of my bosom. Picked up 11 sts under each arm for sleeve instead of 3 and only knit two together once to even out for ribbing. When switching to smaller needles, I worked in K2, P2 rib for 1 round instead of K1, P1.
Comments: I had a devil of a time with the cable cast on - for some reason I kept twisting my stitches but only discovering it on the 5th or 6th round. I also had some difficulty with the part of the pattern where I was to separate the sleeves from the body. Twice I followed the pattern exactly as written, but my gut told me that it wasn't coming out right, so I went with my instincts and worked it the way I thought it should be done (with more stitches for the body than for the sleeves). I think that part of the pattern has been corrected since. I made the smallest size because I didn't want a baggy sweater and was afraid that the 33.5 was too close to my actual measurement (34). I don't think that the size I made was too small (even with the added ribbing for the bust and extra stitches picked up at the underarm), but I think I could have made it an inch or two longer. It's a lovely pattern, but I don't know if I will ever wear this sweater. I feel like a hoochie mama in it.


Cobblestones

Pattern: Cobblestone Blocks (click on link)
Dimensions: 63" x 74"
Materials: 100% cotton fabrics, Warm and Natural White batting
Machine pieced
Machine Quilted by Jacci of Mill Creek Machine Quilting, South Portland, Maine
Started July 2, 2007
Finished August 14, 2007 (That includes sewing on the binding)

Comments: This is a really simple block that produces stunning results. I love this quilt so much that it's a good thing I didn't make it as a gift. The size is perfect for nesting on the couch and even works on a twin size bed.

Sahara

Pattern: Sahara by Wendy Bernard purchased online from Stitch Diva Studios
Yarn: Jeannee by Plymouth Yarn (used just under 6 skeins for size small - 111 yards/skein)
Needles: Size 6 (Susan Bates 24" circular and Addi Turbo 16" circular) and 4 (Addi Turbo 24" circular and 16" Clover Bamboo)
Modifications: For the provisional cast on, I used the crochet chain method. Otherwise I made no other changes. I got exact stitch gauge with the yarn but a slightly shorter row gauge so I used the row count as written to obtain a shorter garment and it worked! I was very nervous about the negative ease, but the fit is perfect. If I made another (which I may do but with long sleeves) I think I'd make it a bit shorter in length by increasing more frequently after the waist. I would also make sure I had 2 selvage stitches on the neckline - I goofed and had 2 on one side and only 1 on the other.

Comments: This was a fun and easy knit with enough variety to keep me interested. I love the short row shaping for the sleeve caps and the side hems and the fit is exactly as expected. I wore this all day and garment held its shape throughout. The yarn was a dream to work with and very inexpensive.
I wore this without blocking and found that the sleeve seams could probably use some blocking only to keep the caps from rolling. They are a bit looser than I anticipated, even though I bound off using the same size needle and with regular tension.
Bottom line: This is definitely one sexy little knit!

Suplice Lace Top

Pattern: Surplice Lace Top designed by Gayle Bunn in The North American Designer Collection No. 4 by Nashua Handknits
Materials: 7 skeins of Dale of Norway Svale color No. 7432 to make size small (used all but 1 yard!!!), Susan Bates circular needles in sizes 3 and 5.

Finished Measurements: Bust 33.5", underarm to hem length 12.25", total length 20.25"

Modifications: Substituted the Svale for the Nashua Handknits Natural Focus Ecologie Cotton and went down a needle size. Knit back and front each in one piece rather than casting off lower bodice and seaming together. (**see below for specific instruction).

Comments: I couldn't be happier with this sweater. The fit, the yarn and the pattern (with all of my tinkering) all came together perfectly. Even though the Svale was quite splitty, the drape is well worth it. I'm not even going to block it!

** How to knit front and back each in one piece (numbers given are for the size small, actual numbers will be different for other sizes):

For Back, when the pattern says to bind off lower body stitches, instead proceed to instruction for Back Bodice all the way to shoulder bind off (I didn't make any changes to shoulder shaping)

For Front, after the last row of the lower body stitches, instead of binding off 90 stitches, knit 35 stitches and place on scrap yarn for holder. On the next 55 stitches, work Right Front Bodice all the way to shoulder bind off. Pick up the 35 stitches held and then pick up 20 stitches from the back of the Right Front through the purl loops of the same row, counting this as row 1 or first RS row. Proceed to knit Left front as instructed through shoulder bind off. [For other sizes, all you need to do is figure out the difference between the total number of lower body stitches and the total number of stitches for each front. For example: for size Medium, the total number of lower body stitches is 94. The total number of bodice front stitches is 116 (58 + 58). 116-94=22. Subtract this number from the total left front bodice: 58-22=36. So, when you start the top bodice section, you would knit across 36 stitches and put them on a holder and then proceed to knit the remaining 58 stitches for the right front.]

Sew front to back at shoulder seams as instructed. For Neckband, begin picking up stitches from Right front as instructed, but pick up 1 stitch less. Continue picking up stitches but pick up twoe less stitches on the left front, then cast on one stitch extra. For the remainder of the neckband, on RS rows, pick up one extra stitch from top of lower bodice for the right front. On WS rows, increase one stitch on the left bodice front. When binding off, when you get to the last stitch of the right front bodice, pick up one more stitch from the top of the lower bodice and bind it off. Cut yarn and securely weave tail on the wrong side. Use scrap yarn to sew the edge of the left front bodice neckband to the wrong side of the lower front.

Fitted A-Line Skirt

Pattern: McCall's #2129 View D (without the applique trim), size 10

Fabric/Materials: Summer City Urban Chicks Orange Blossom by Moda (1.5 yards), trim from Jo-Ann's.

Techniques: Basic Sewing, darts, zipper

Modifications: Added mini fringe to hem:

Comments: This has a higher waist and is more fitted than I prefer, but I still like it very much.

Low-rise Straight Skirt

Pattern: New Look #6345, view A, size 12

Fabric/Materials: Amy Butler Belle Collection Brown/Kashmir (purchased 1.5 yds, used just over 1 yard) and Moda Uptown Daisy Days Brown Spa .25 yd (waist band facing), 1 pkg Wrights Medium Rick Rack (hem trim) in Aqua Blue.

Techniques: Basic sewing, zipper installation

Modifications: Added rick rack to hem and contrasting waist band facing.

Hem Detail:
View of contrasting fabric for the waist band facing:

Comments: I've made the shorter A-line version of this skirt in the same size (one size larger than my measurements call for) to obtain a lower rise. It worked somewhat, but this time, it feels a little too low. I had more than enough fabric left over to make another belt:

I "fussy cut" the belt by centering my strips over the pattern and was able to achieve the look of two different prints from the same fabric. The belt buckle is from jcarolinecreative and the pattern is my own.

Summer Blouse

Pattern: Simplicity It's so Easy #3842 (view B) Size 8

Fabric: Sofia Cotton Lawn by Robert Kaufman 1.5 yds (pattern calls for 1.75 yds) plus .25 yd of white cotton from JoAnn Fabrics

Techniques: Basic sewing, gathers, rolled hems, bias tape facing

Modifications: Used contrasting fabric for front insert and added lace trim. Cut ties on the grain rather than on the bias and folded in half twice rather then sewing a tube.

Comments: I love the fit of this and the pattern was relatively easy, but required careful attention to detail. The armholes are a bit too peek-a-boo for my taste, so I will be sewing them up a little more. Diagrams for view B in the pattern instructions do not match the actual sleeve length, which caused me to take a second look at the pattern pieces. The next time I make this top, I may omit the insert, opting to wear a cami under it instead. Because of the sleeve construction, this pattern works best with light weight fabric with good drape. A heavier fabric would result in "wings".

Easy Tote Bag

This sturdy square bottom bag is perfect to tote around fabric, yarn, books, groceries or anything else. Once you master the construction, make it your own by changing the dimensions, adding pockets, contrasting bands, applique or trim. Instructions are provided for an optional ribbon embellished handle. This version does not have a pocket, but one (or more) can easily be added to the lining before you sew it to the outside.
MATERIALS NEEDED:

  • 1/2 yard each of two coordinating cotton fabrics
  • 1/2 yard of cotton duck cloth (a light weight canvas)
  • 1 yard of Heat'n Bond Lite
  • 1 & 1/2 yards of 1 inch wide cotton or nylon belt webbing
  • one spool of thread that matches both fabrics and handle

Optional for decorated handle:
  • 1 & 1/2 yards of 7/8" ribbon
  • glue stick

Supplies: You will also need a sewing machine, iron and board, pencil, and ruler. Rotary cutting supplies (mat, ruler and rotary cutter) are recommended for accuracy, but are not necessary to make the bag.
About seams: Unless otherwise stated, all seams are 1/4 inch. A quarter inch foot, used by quilters, is very handy. It has a blade on the right hand side that acts as a guide for your fabric. They are sold at most shops that sell sewing machines. The one shown below is made for a low shank machine and fits both my Elna and Janome.
If you do not have this foot, some machines allow you to adjust your needle position so that the needle falls exactly 1/4 inch from the right edge of your sewing foot. The needle position can also be adjusted with the zig zag dial or button. If you cannot adjust your needle, then you can eyeball it by using the edge of your foot as a visual guide. The most important thing is to be consistent with all seams.

CUTTING INSTRUCTIONS:

From each of your cotton fabrics, the canvas and the Heat'n Bond, cut two 15 1/2 inch squares. (How easy is that?)

This is done easily and accurately with a rotary cutter. If you do not have one, using a ruler, draw a 15 & 1/2 inch square on a paper grocery bag, newspaper, or on a piece of interfacing and use as a pattern.

Prep for optional for Handle embellishment:

If you wish to use an embellished handle, take your webbing and run a glue stick down the center of the entire length. Center the ribbon on webbing and press firmly down the length of the ribbon (it doesn't stick very well, so don't panic if it seems like it isn't working). Set aside to dry while you sew the bag.

Step 1:
Place one square of the Heat'n Bond on the wrong side our your outside bag fabric with the rough shiny side of the Heat'n Bond facing the wrong side of your fabric, matching all edges. The dull paper side will be facing up. With your iron set on Silk (no steam), fuse the Heat'n Bond to your fabric, beginning in the center and slowly moving outward in each direction (this prevents bubbles). Do not slide, but lift and fuse, overlapping each time. Go over the edges once more. Flip over and iron on the right side of the fabric. Set aside and allow to cool. Repeat with the other square of outside fabric and Heat'n Bond.
Once your squares are cool, peel the paper away from your fabric squares. The back of your fabric is now coated with adhesive. Throw paper away.
Step 2:
Position one of your outside fabric squares over one of the canvas squares, matching all edges. The shiny side with adhesive will be facing the canvas. Fuse as in step 1 above. Repeat with other square.
Step 3:
If your fabric has a directional print or stripes, mark the top on the back of the canvas with a pencil or piece of tape. Put your two fused outside fabric squares right sides together ("RST"), matching raw edges. Sew around three sides, keeping the top side open if you have a directional fabric, backstitching at beginning and end. Do not turn right side out.
Step 4:
Make corner gussets as follows: reach into one corner of the bag, and open out the corner, matching the seams in the center. It is very important that the seams are lined up on both sides, so take your time.
Measure down 2 inches from the very tip of the sewn corner (not the raw edge), and draw a line perpendicular to the stitching.
Pin in place. Repeat with other corner.
Sew on the line you drew, backstitching at beginning and end. Repeat for other corner.
Trim off corners about 1/4 inch from the stitching line.
Turn bag right side out. Press seams to one side.
Step 5:
Place your two squares of lining fabric RST. This time you will be leaving an opening at the bottom center about 7 inches wide. Mark the opening with pins or a pencil. Begin by sewing down the right side, turn corner and stop at the place you marked on the bottom, being sure to backstitch at beginning and end. Start again at the other side of the opening in the bottom (backstitching to secure) and continue across bottom, turn corner and stitch right side. Trim threads.

Make corner gussets for the lining as you did for the bag outside. Do not turn bag right side out. Press seams to the opposite side that you pressed the bag outside. Set lining aside.

Step 6:
Optional embellished handles: (If you are not embellishing handles, skip this step and proceed to Step 7). With the ribbon side up, top stitch the right side with the smallest seam allowance you can. When you get to the end, turn the corner and continue to top stitch the other side. Go slowly as the ribbon likes to wiggle, even when glued.
Step 7:
Cut webbing in half and trim each half to 21 inches. Tip: If using nylon web, very lightly touch the ends to your iron to sear the edges and keep them from unraveling. If using cotton webbing, zig zag stitch the ends.

Take the outside of your bag, and measure in 3 and 1/2 inches from the seam. Pin one side of the handle to the bag as shown.

VERY IMPORTANT NOTE: If you want the embellished part of your handle to face out, then it should be facing the bag at this point, not you. Do not follow the photographs. For this bag, I chose to have the embellished part of the handle on the inside - see photo of finished bag for result.

Measure in 3 and 1/2 inches on the other side of the bag, pinning the other end of the handle in place, being sure not to twist it. Machine baste in place using 1/8 " seam allowance.
Step 8:
Slip the outside of your bag into the lining - RST - tucking handles in between the layers, not up.

Pull lining up until the raw edges of your lining match the raw edges of your outside bag. Match up seams and pin. (NOTE: Seams match up better if they are pressed in opposite directions. If at this point you see that both seams were pressed in the same direction, finger press the lining seam in the opposite directions. This allows the seams to "lock" in place and makes them less bulky and easier to sew).
Pin all the way around the raw edges.

If you have a free arm sewing machine, remove the base extension.

Sew outer bag and lining together as pinned using a 1/4 " seam allowance (this is the only point in the bag construction where this really matters).

Step 9:
This is the fun part! Remember that opening in the bottom of the lining?

Reach in there and grab your outer bag...
and pull it through! Wasn't that cool?
Press in the edges of the opening 1/4 inch.
Hand or machine stitch the opening to close.
Push your lining into the bag and tug and smooth it down. You will see that about 1/4 inch of the lining shows on the outside of the bag. Although it means that your lining is a wee bit shy of the bottom of the bag, it does add a nice decorative element. If you do not like this, then boss that lining around and tug it in place so that the seam is right at the top. In the next step you will top stitch 1/4 inch from the top instead of in the seam.

Press firmly all around the top. Pin in place if needed. If you used a ribbon with painted decoration, be sure to avoid touching it with your iron as it will melt the decoration. Cover handles with a piece of fabric to protect it.

Step 10:
Finish your bag by top stitching in the seam between the lining that shows at the top and the bag - this is called "stitch in the ditch". If you pulled your lining all the way down, just top stitch 1/4 inch from the edge as stated above.
Flip handles up and stitch each one in place - backstitching all the way backwards and then forwards again to reinforce.
You're done!
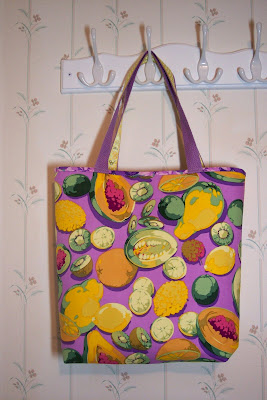
Fill your bag with goodies and go show it off!